31 July 2023
Common TTPs of attacks against industrial organizations. Implants for gathering data
This is the second part of our research based on an investigation of a series of attacks against industrial organizations.
In the campaign, the attackers aimed to establish a permanent channel for data exfiltration, including data stored on air-gapped systems.
In total we have identified over 15 implants and their variants planted by the threat actor(s) in various combinations.
The entire stack of implants used in attacks can be divided into three categories based on their roles:
- First-stage implants for persistent remote access and initial data gathering
- Second-stage implants for gathering data and files, including from air-gapped systems
- Third-stage implants and tools used to upload data to C2
This part of the research is devoted to second stage malware used to gather data on infected systems.
Two types of implants for gathering data on infected systems were found:
- implants of the first type are designed to collect and archive various data on the local machine,
- implants of the second type were used to collect information about removable drives, shadow copy their contents and infect them with a worm, which was then used to exfiltrate data from air-gapped networks.
The full report is available on the Kaspersky Threat Intelligence portal.
For more information please contact ics-cert@kaspersky.com.
Dedicated implant for gathering local files
In May 2022, a dedicated implant for gathering local files was discovered. The implant uses a loading scheme based on the DLL hijacking technique, where the malicious DLL loader ensures persistence by creating a service named “WinSystemHost”, decrypting and injecting the payload stored as binary data in a separate file into the memory of a legitimate process.
The execution flow of the loader consists of 3 steps:
- When run without parameters, it creates a service to run itself with parameter
--2 - When run with parameter
--2, it restarts itself with parameter--1 - When run with parameter
--1, it starts the “msiexec.exe” process, reads and decrypts the payload, and injects it into the memory of the “msiexec.exe” process
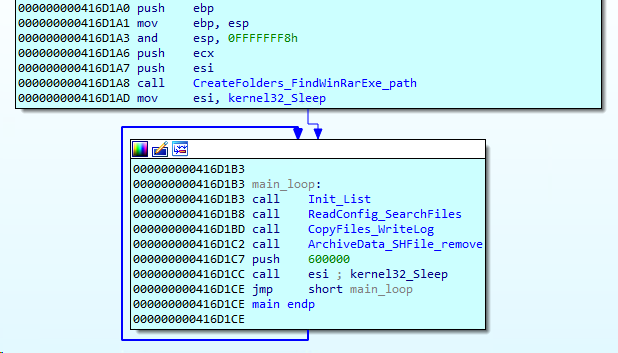
Once the payload starts to be executed in the memory of “msiexec.exe”, it runs into an endless loop consisting of 6 simple steps:
- Create folders for file storage (if they do not exist) and find the path to “WinRar.exe”
- Decrypt strings
- Read config and start searching for files on all disks
- Copy files and write log
- Archive copied files and clean up
- Sleep for 10 minutes
First, the implant creates the folder “C:\ProgramData\NetWorks”, then it creates one subfolder for temporary file storage (“C:\ProgramData\NetWorks\fl”) and one subfolder for archived data storage (“C:\ProgramData\NetWorks\ZZ”). It then searches for an existing “WinRar.exe” application in %ProgramFiles% and C:\Windows\SysWow64 subdirectories.
If no “WinRar.exe” is found, the implant terminates.
The loop part of the main function starts with internal string decryption. Then the implant checks its config file, “C:\ProgramData\NetWorks\gfc”, and if it doesn’t exist the implant removes all previously created folders and then terminates. This indicates that the implant was designed to run in an environment prepared in advance, where a configuration file was already present.
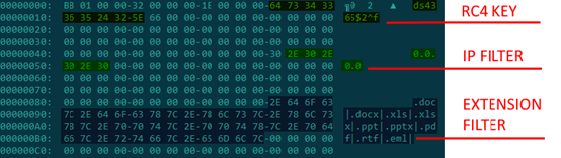
The config is encrypted with RC4 with the key “bGkds&sy6$^3gsa” and is used to store another RC4 key, an IP filter, and a list of file extensions by which files to be copied to “C:\ProgramData\NetWorks\fl” should be filtered. The implant also writes all paths to the file “1.log”. Right after reading the config, the implant starts searching for files on all drives connected to the infected machine.
All files that have extensions matching the filter are copied to “C:\ProgramData\NetWorks\fl”. Then “WinRar.exe” is called to create an archive in “C:\ProgramData\NetWorks\ZZ”. The archive file name is composed of the current date and time.

Once an archive is created, the implant uses SHFileOperationW to remove files located in “C:\ProgramData\NetWorks\fl”. In the last step of the loop, the implant goes to sleep for 10 minutes.
In order to exfiltrate the data collected, the threat actor uses a stack of implants to upload the archives to Dropbox. The stack is described in the third part of this report, “Implants for uploading data”.
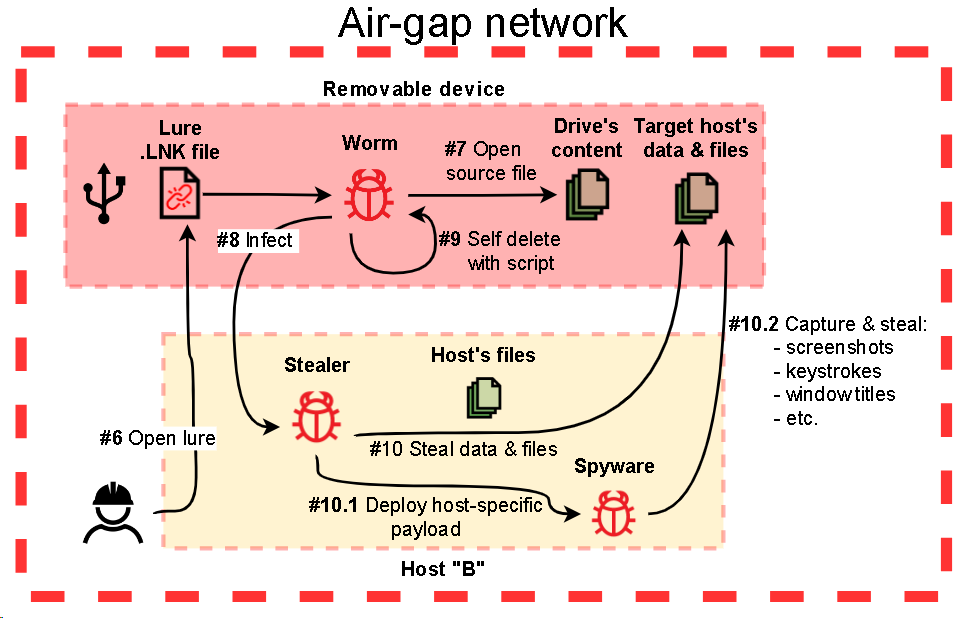
Stack of implants used to exfiltrate data from air-gapped networks via removable drives
In April 2022, we discovered malware designed to exfiltrate data from air-gapped systems by infecting removable drives. The malware discovered consists of at least 3 modules.
Step 1
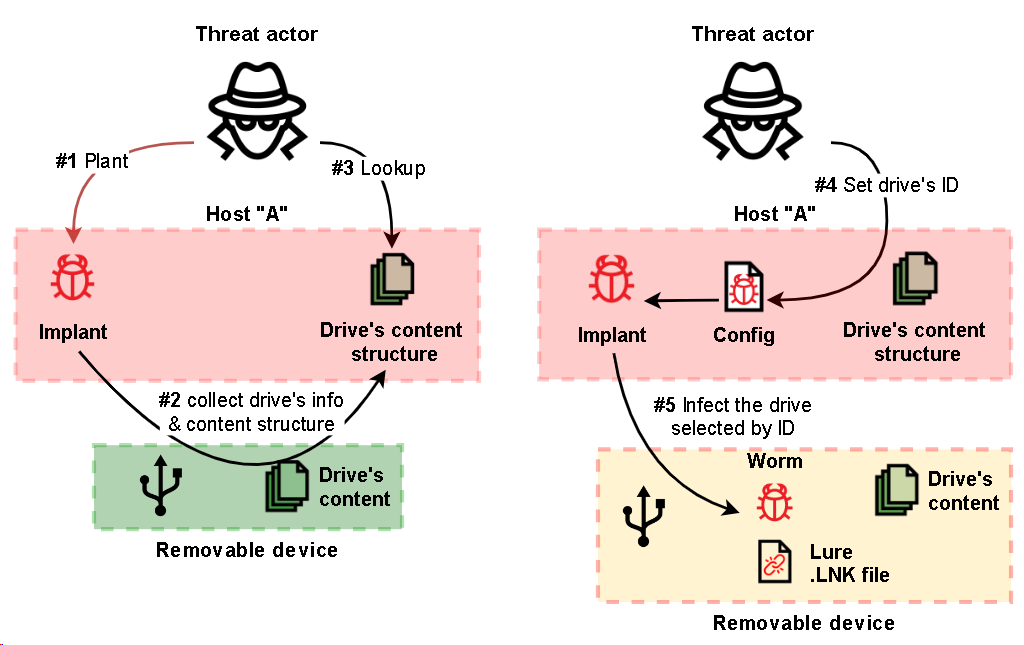
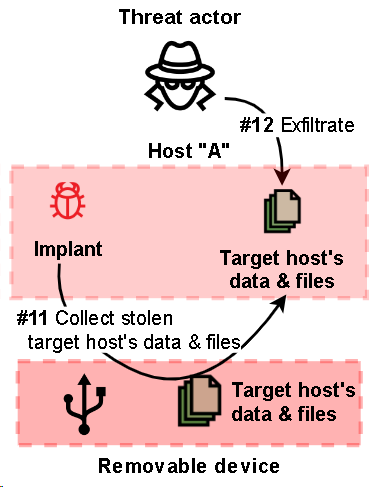
The first (main) module is responsible for handling removable drives, including collecting information about a drive, cloning each drive’s filesystem structure to a local temporary folder and keeping the structure up to date, collecting stolen files from a drive and planting second-step malware on newly connected drives, as well as capturing screenshots and window titles on the infected machine.
The module’s behavior can be adjusted using a config placed on the host at the static path “C:\Users\Public\Libraries\main.ini”. The config defines whether the implant should try to infect a drive and if it should, which infection method is preferable.
First the main module creates a folder in “%TEMP%” (for example, “TCABC8.tmp”), where it will store logs, info on connected drives and the drives’ contents. The exact name of the folder is hard-coded into the module and, with this in mind, we can state that at least 4 variants of this implant have been deployed (based on the number of unique folder names found).
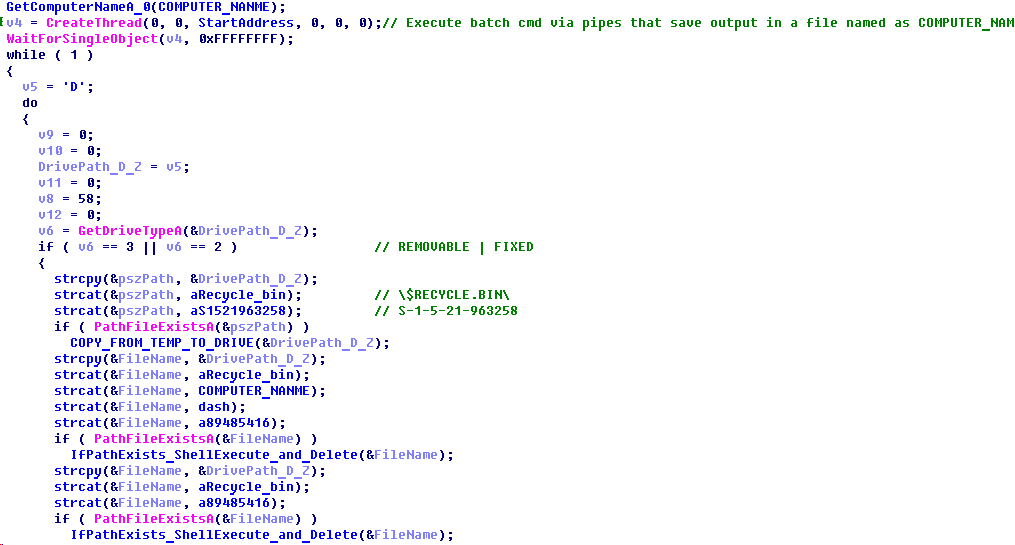
Next, for each removable drive (from “D:” to “Z:”), the implant creates a subfolder (for instance, “%TEMP%\TCABC8.tmp\12345678”, where the subfolder’s name is the same as the serial number of the drive. These folders are then used to store logs produced by the implant, a copy of the file system structure of each drive, including file attributes but without the files’ contents, as well as stolen files and files containing the output of the third and fourth modules.
On each removable drive, the implant creates a hidden folder named “$RECYCLE.BIN” in the drive’s root directory and an empty file named “S-1-5-21-963258” in that folder. The file tags the drive as infected. The implant also creates an identical empty file in “c:\windows\tasks\S-1-5-21-963258” to tag the host as infected and to prevent next-step implants from gathering data on that host.
The implant also checks “%TEMP%\TCABC8.tmp” for the following files that are used to infect a removable drive whose serial number matches the name of the folder:
- “mcods.exe”, which is a legitimate McAfee executable vulnerable to DLL hijacking
- “McVsoCfg.dll”, which is the second-step payload
- “DOC”, “PDF” or “DIR” files, which define the lure link file to be used
It is obvious that the presence of the files mentioned above in the folder assigned to a specific removable drive indicates that the attackers first analyze the contents of removable drives for some time and only then copy the files used to infect a specific removable drive to the folder specified.
Step 2
To infect a removable drive, the main module simply copies two files, “mcods.exe” and “McVsoCfg.dll”, to the drive’s root directory and sets the “Hidden” attribute for both files.
In addition, a fourth-step payload file named “89485416” or “89485418” may exist. If it exists, it will also be copied to the removable drive together with the second-step implant.
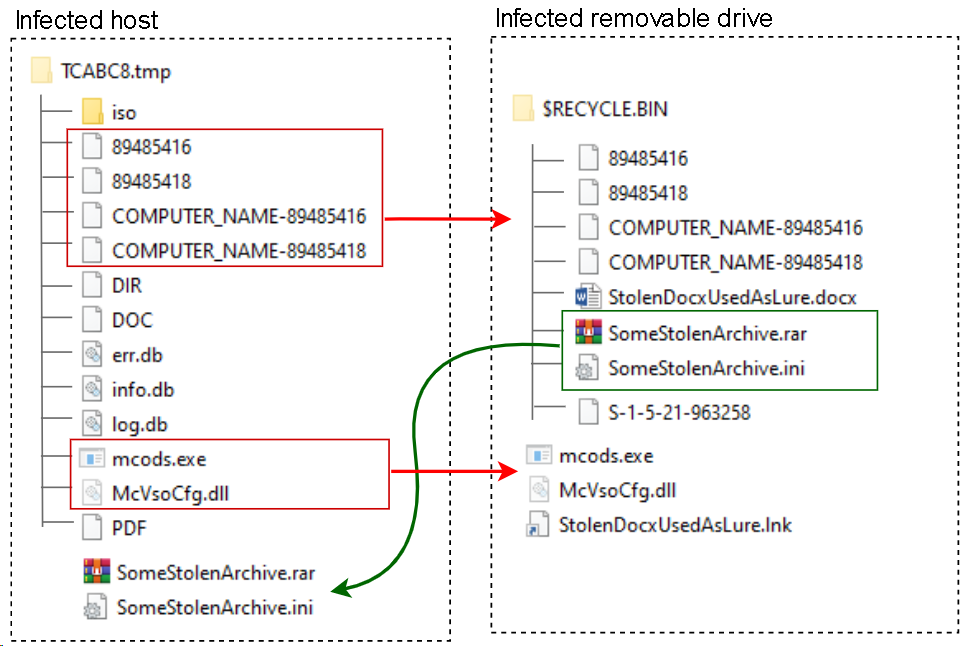
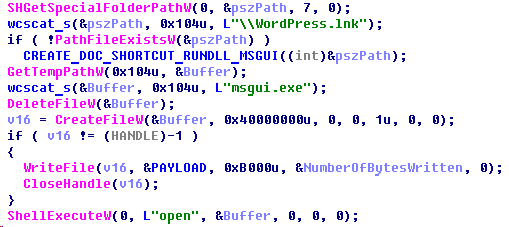
Then, depending on the config and the extension (“DOC”, “PDF”, or “DIR”) of the file found in the temp directory, the main module recursively searches the drive’s root path for either a file (with the extension “.docx” or “.pdf”) or a folder. In both cases, the name of the object found is used to produce a lure link file named “[document or folder name].lnk” (in the example shown in the illustration above, the file was named “StolenDocxUsedAsLure.lnk”) in the root directory of the removable drive, while the original object is either moved to “$RECYCLE.BIN” (if it is a file) or simply set to “hidden” (if it is a folder) for later use.
through an infected removable media
The lure link file is created with the “Target” property set to “rundll32.exe url.dll,FileProtocolHandler mcods.exe”. When a user opens the lure ”.lnk” file, the OS will load “mcods.exe”, which will load “McVsoCfg.dll” and call its function “McVsoCfgGetObject”. Such a long chain of loads and calls makes sense because the second-step malware, “McVsoCfg.dll“, is designed to be stealthy and will try to remove the intermediate executable “mcods.exe”. This can be done only if the handle on “mcods.exe” is closed at the moment when the OS tries to delete the file.
When the second-step malware planted on the drive is executed, it starts by searching for the lure document in “$RECYCLE.BIN” or a folder that has the same name as the lure. Then it checks whether the tag file “c:\windows\tasks\S-1-5-21-963258” exists. If it does, the implant just opens the original file or folder via a ShellExecuteW call and terminates.
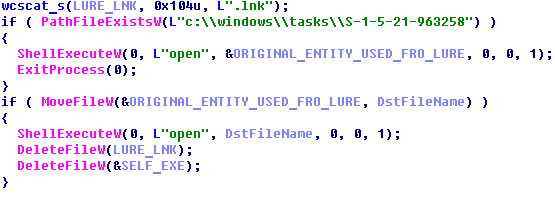
Otherwise, if no tag files exist, it will copy the original file from “$RECYCLE.BIN” to the root directory of the drive, open it with ShellExecuteW, then remove the lure link and the legitimate file “mcods.exe” from the removable drive. Right after that, the implant deploys the third-step malware executable by extracting it from its own file (“McVsoCfg.dll”) and saving it to “%APPDATA%” with the name “msgui.exe” on the host being attacked. It also creates a link file which points to “msgui.exe” and then opens the link via a ShellExecuteW call.
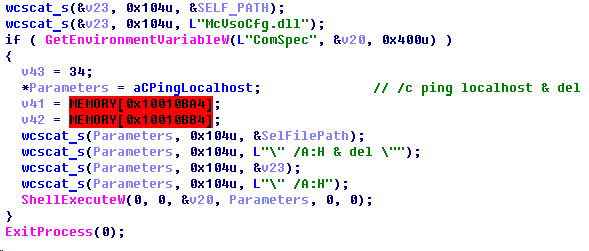
After the infection routine is completed, the second-step implant (“McVsoCfg.dll”) will try to remove itself from the drive by using a batch script executed via ShellExecuteW, which pings localhost (to give the implant’s host process time to terminate first) and then deletes the module.
Step 3
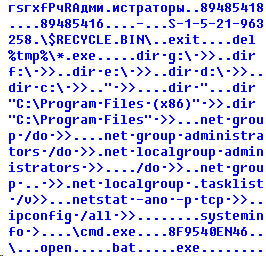
The third-step implant, “msgui.exe”, is quite small and simple – it is designed to execute a batch script with “cmd.exe” to collect data and save the output to the drive’s “$RECYCLE.BIN” folder so that it can be collected by the main module of the malware (when connected to the originally infected host). Then it looks for any fourth-step file to be executed and then deleted (if it exists).
Step 4
The fourth-step malware consists of two files:
- A simple dropper of the payload (similar to that used by second-step malware)
- The payload, which is, in fact, a modified version of the first-step module and is also designed to collect information about a drive, collect files, capture screenshots and keystrokes, but without the routine responsible for infecting a removable drive
The fourth-step malware file(s) can be named either “89485416” or “89485418”. The former of the two is a “batch script” payload and the latter is an executable file. A file name can also have a [COMPUTER_NAME] prefix, in which case the fourth-step malware is deployed on a specific computer only (otherwise the payload will be executed regardless of the name of the computer). The fourth-step code is quite small and implements two main routines:
- Collect and archive files
- Capture keystrokes, the window title, and a screenshot
The routine for gathering files is compiled from the same sources as the relevant routine used by the main module, while the code for capturing screenshots and the window title is new and so is the code for capturing keystrokes.
Both modules (first-step and fourth-step) have similar configurations and data saving routines:
- The behavior of both modules depends on settings stored in an “.ini” file (“C:\Users\Public\Libraries\setting.ini” is used by the fourth-step malware and “C:\Users\Public\Libraries\main.ini” is used by the first-step malware).
- Depending on their settings, both modules may collect information about a drive, as well as capture screenshots and window titles on the infected host, search for and copy documents (.doc, .docx, .xls, .xlsx, .ppt, .pptx) and images (.png, .jpeg, .jpg, .bmp).
- Both modules save basic information (attributes) on a removable drive in a “log.db” file using the same data formatting, while additional information (including a list of files and directories) is saved in “info.db” and error messages are saved in “err.db”.
To collect all the stolen data, the threat actor uses a remote shell to run implants designed to upload data, which are described in the next section of the report.
Conclusion
The threat actor attempted to make detecting and analyzing the threat more difficult by hiding the payload in encrypted form in a separate binary data file and by hiding malicious code in the memory of legitimate applications via DLL hijacking and a chain of memory injections.
The exfiltration of data from air-gapped networks is a common routine for many APTs and targeted cyberespionage campaigns. And, despite the existence of a broad variety of exfiltration methods, in most cases threat actors choose TTPs based on infecting removable media.
Recommendations
- Install a security solution with support for centralized security policy management on all servers and workstations and keep the antivirus databases and program modules of your security solutions up-to-date.
- Check that all security solution components are enabled on all systems and that a policy is in place which requires the administrator password to be entered in the event of attempts to disable protection.
- Ensure regular scanning of all removable drives used in OT.
- Consider using Allowlisting and Application Control technologies to prevent unknown applications from being executed.
- Consider using Device Control technologies to ensure that all removable devices are used securely.
- Check that Active Directory policies include restrictions on user attempts to log in to systems. Users should only be allowed to log in to those systems which they need to access in order to perform their job responsibilities.
- Restrict the use of accounts with local administrator and domain administrator privileges, with the exception of cases when such privileges are necessary to perform the job responsibilities.
- Consider using a password management solution to manage the passwords of local administrator accounts on all systems.
- Enforce a password policy that has password complexity requirements and requires passwords to be changed on a regular basis.
- Consider using Managed Detection and Response class services to gain quick access to high-level knowledge and expertise of security professionals.
Appendix I – Indicators of compromise
Note: The indicators in this section are valid at the time of publication.
The full version of indicators of compromise, including Yara rules, is available in a .ioc file on the Kaspersky Threat Intelligence portal.
Dedicated implant for gathering local files
MD5
4C1ADC1778CE07CD655DB129AF1DA7E0 (DynTray.dll)
71D919105627C67AB9FB9A7152015CF6 (Data)
Stack of implants used to exfiltrate data from air-gapped networks
MD5
3E22E7F5A6EE0A7D3D9A5CBFA7939C98 (tmp.exe)
2DB858C4CA836120D3124EB5490195EA (main.ini)
D2D7FD5C7372CD81D6BC4199F211A42C (RtkAudio.exe)
4D5963B7D931A02265EA5231961935E9 (mcvsocfg.dll)
3A532B8481F22B78ABC718AC5CDB3F06 (msgui.exe)
36A029CB62BFCB86394B49E5ACF36BEF (SCR)
1DBC1DEFC2AC6578D83D5C45D9836482 (abbyfine.exe)
9F402F0B2C84ED577E9EE76DCF640B70 (f04803w3.exe)
0E69850A0F67165D4E3D06987D14B2E6 (automonitor.exe)
C929DCC69CF6546D56C2A68D31D7728D ($rjkdi4v.exe)
Appendix II – MITRE ATT&CK Mapping
The table below contains all the TTPs identified in the analysis of the activity described in this report.
| Tactic | Technique Number | Technique Name and Description |
|---|---|---|
| Initial Access | T1566.001 | Phishing: Spearphishing Attachment Threat actors used lure documents to deploy off-the-shelf spyware. |
| Execution | T1204.002 | User Execution: Malicious File A system is infected when the user runs the malware believing it to be a legitimate document. |
| T1059.003 | Command and Scripting Interpreter: Windows Command Shell Uses cmd.exe to execute multiple commands. |
|
| T1106 | Native API Uses CreateProcessW function to execute Windows Command Line |
|
| T1053.005 | Scheduled Task/Job: Scheduled Task Malware is executed via a Windows task created by the threat actor. |
|
| Persistence | T1547.001 | Registry Run Keys / Startup Folder: Malware achieves persistence by adding itself to the Registry as a startup program. |
| T1543.003 | Create or Modify System Process: Windows Service Installs itself as a service to achieve persistence. |
|
| T1053.005 | Scheduled Task/Job: Scheduled Task Malware is executed via a Windows task created by the threat actor. |
|
| Defense Evasion | T140 | Deobfuscate/Decode Files or Information Uses an RC4 key to decrypt the malware configuration as well as communication. |
| T1055.002 | Process Injection: Portable Executable Injection Malware injects itself into various legitimate processes upon execution (msiexec.exe, svchost.exe). |
|
| T1497.001 | System Checks Employs various system checks to detect and avoid virtualization and analysis environments. |
|
| T1497.003 | Time Based Evasion Employs various time-based methods to detect and avoid virtualization and analysis environments. |
|
| T1574.002 | Hijack Execution Flow: DLL Side-Loading Threat actors abused a legitimate application binary to load a malicious DLL. |
|
| Discovery | T1083 | File and Directory Discovery The malware attempts to discover files of various types (.doc, .docx, .xls, .xlsx, .ppt, .pptx, .pdf, .rtf, .eml). |
| T1016 | System Network Configuration Discovery Threat actors use the netstat and ipconfig utilities to get local network interface configuration and enumerate open ports. |
|
| T1033 | System Owner/User Discovery Threat actors use the systeminfo, whoami, and net utilities to get information about the user and the infected system. |
|
| T1057 | Process Discovery Threat actors use tasklist to enumerate running processes. |
|
| Collection | T1005 | Data from Local System The malware is designed to collect and exfiltrate arbitrary data, including from air-gapped systems, by abusing removable devices. |
| T1052.001 | Data from Removable Media The malware is designed store all data collected on a specific infected USB drive in order to exfiltrate it from an air-gapped network. |